
I Don't Do No Double Negatives - All About Multiple Exposures
- lizjenkin

- Dec 13, 2021
- 10 min read
One of the eeriest and most magical forms of alternative photography is multiple exposure. Although highly technical, this process has inspired generations of artists to create. Multiple exposure photography may be a wonderful method to materialise your ideas, whether you envisage an entire forest enclosed inside the silhouette of a wolf or a child's face illuminated by the sunrise.
During the late 1800s, as photography became more accessible and widespread, this method of showing multiple images within the same frame gained popularity. Not only was it useful for creative portraiture, but also for comedic illusions and practical jokes. Some people, however, used this form of image manipulation to push moral boundaries. Through their use of multiple exposure, they claimed that they had taken "spirit photographs" - alleged proof of ghosts - and they were largely believed. After all, the average person had little to no idea of how this new technology worked; for all they knew, the camera could be a revolutionary device capable of seeing into the spiritual realm. The translucent figures on these photographs were certainly compelling evidence for this idea.


Over the decades, the art of multiple exposures in film photography has been further refined, with a major focus on conceptual art and self-expression. As we have learned more about photography, we have developed an understanding of its subjectivity and, in this age, we know that a photo may not be a perfect representation of reality. This changing perspective has provided photographers with greater creative freedom which has translated to the digital age well, as photographers and graphic designers alike create images with Photoshop. Recent trends for multiple exposures include animal silhouettes encompassing their habitats, merging portraiture with the natural world, especially trees and flowers, and compositions with a shot of the subject in its environment paired with a close-up shot of its details.

You may have heard of double or multiple exposures, but what is the difference? A multiple exposure consists of two or more images in one frame. A double exposure is a type of multiple exposure which contains precisely two images in one frame. Most multiple exposures you see will be double exposures, because adding more layers can make the final image unclear, but there can certainly be some interesting creations when using several different photos! While these images look complicated, they're actually quite simple to create.


PHOTOGRAPHERS
Brandon Kidwell
A philosophical mind, Kidwell uses art to fulfil his need for creativity and self-expression. With no formal training in photography, Kidwell uses the tools at his disposal to satisfy this "itch to create" - his trusty camera is, in fact, his iPhone.
Using an iPhone as a tool first allowed me to focus on the most important ingredients of photography – the story, the subject and the composition. - Brandon Kidwell, iPhone Photography School
Kidwell is the perfect innovator for the amateur photographer to learn from; using an iPhone takes away the need to worry about the technical aspects of a DSLR camera, which can be daunting at the beginning. The beauty of using a smartphone is the wide range of editing apps, many of them free, which can be used to craft masterpieces such as Kidwell's multiple exposures. Filterstorm, Union and PS Touch are the apps Kidwell commonly uses to blend his images together, usually using the screen blending mode.
This simple processing method lends itself well to Kidwell's most iconic technique - creating illusion. Faces and hands are frequently blended together, and profile silhouettes are perfectly combined with foliage and water. Inspired by his family and everyday life, most of his images feature either himself or his children, and are carefully cultivated to portray a message from his life experiences.


These images show that you don't need in-depth expertise or even high-end equipment to create stunning double exposures. You simply need a keen eye for composition and patience. And a smartphone. (Sorry, Dad, you'll need to upgrade!)
Click to go to Kidwell's website, where he further sheds light on his process and the meaning behind his images. His "wisdom for my children" collection is particularly poignant.
Eric James Leffler
Leffler is a photographer based in California. His primary focus is wedding and occasion photography, but in his spare time he loves to shoot double exposures on film.
The method Leffler usually uses is to take one photo and then a second photo directly afterwards without advancing the film, as he did in picture 1 below. Sometimes, however, he shoots an entire roll, rewinds and reloads it, and shoots over it again at a later date, as shown in picture 2. Here, Leffler shot cityscape and street scenes of New York and then later shot some portraits in San Francisco on the same film.
This shoot-reload-shoot technique is the method I am most interested in - partially because I'm not sure whether my film cameras are suited to or have a function for double exposures, and also because I love the idea of contrasting two different subjects that aren't usually seen together. This would be the most appropriate method, after all, flitting between different locations for each shot wouldn't exactly be ideal!


I am transfixed by Leffler's double exposures. By combining portraits and cityscapes, he gives an insight into the world of his subjects, conveying complex ideas of emotion and identity. Location can tell you a lot about a person, about their wants, fears, and values.
There is a distinct lack of clarity through the whole of picture 1. It's hard to make out the woman's features between the inviting bar scene and the street behind her. This envelopes us in a sense of ostracism, as though we are looking in through a window, but the view is obscured by the reflections of the cold outside. Like the anonymous woman, we are excluded. In picture 2, this woman gazes out to a rural landscape, yet the urban scene shown within her suggests her heart belongs to the city. Why is she torn? What is her story?
Here you can see Leffler's blog, where he explains his double exposure methods in more detail.
Dan Mountford
YouTube is littered with tutorials on how to use editing software to get the "Dan Mountford double exposure" style portraits. In actuality, Mountford creates most of his images in-camera - his post-production process usually consists of a few minor changes in tone or levels, occasional blemish removal, and in some cases, the addition of some vector.
Mountford initially learned his technique when using film cameras, which involved a lot of trial and error, and has since refined his method using digital cameras. Most of his experimentation centred around finding the right balance of exposure and tonality between the two images, which is, of course, much easier with the instant feedback of digital images.
A photograph is great for linking people and places with memory, I was simply trying to think of another way to portray that visually through the use of people who at the time meant a lot of me or places I lived and grew up in. - Dan Mountford, The Phoblographer
Influenced by abstract photography, much of Mountford's work is conceptual. He aims to combine emotions with cherished memories of people and places dear to him.


Mountford frequently uses defined silhouettes against a textured white background, allowing the second image to fill the frame inside the profile. This not only anonymises the portraits, but draws attention to the subject matter contained within them. The ambiguity of these photos, with their lack of explanation, allows us to create our own meanings. Perhaps the man on the right died of lung cancer or battles with addiction. Perhaps it's meant to be a wake-up call about the harsh reality of smoking's effect on our health. The beauty of conceptual art is its ability to draw on our individual experiences, stirring up meaning and emotion unique to us.
Click here to go to Mountford's Instagram site, where he posts collections of his work.
Olan Mills
I couldn't talk about multiple exposures without mentioning Olan Mills Portrait Studios, named after its founder in 1932. Over the next few decades, Olan Mills dominated the family portraiture scene, opening studios in retail outlets around the USA and the UK. Unfortunately, the company struggled during the turn of the century due to the rapidly changing industry, and has since ceased operating.
Why is all of this important to multiple exposure photography? Mills didn't create abstract art like Mountford, or combine portraiture and landscapes like Leffler. He simply shot portraits for families and school yearbooks. Right?
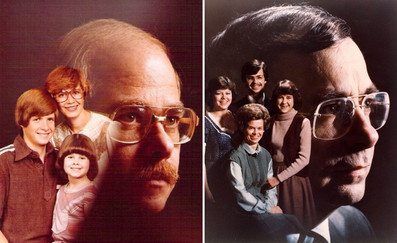
Mills pioneered a technique that, unbeknown to him, would see his images immortalised for generations to enjoy. Known as the "Olan Mills double exposure" method, Mills' way of combining separate images to create a single portrait has gained much attention over the last few years, but not all of it is positive.
As you can see, Mills' family portraits would often feature the face of a father, the "head of the household" superimposed over the rest of his family. His wedding shots are equally... interesting... with a beautiful bride smiling through the head of her husband. At the time, people loved them, but it's safe to say they haven't aged well.


Despite being deemed "cheesy" and "cringe" by many, this technique has been adopted by a growing number of content creators in search of a vintage aesthetic. It has become somewhat of an internet sensation. There are a number of tutorials on YouTube showing you how to create that same "70s/80s family portrait" style; after all, they make great Christmas cards, as you can see in the link below.
How-To
Traditionally, a photographer would expose their film and then, instead of advancing the film forward for the next shot, expose the same section of film again. In order to do this on a film camera, you need to reset the shutter while keeping the film in place. This will usually involve holding the film steady by the rewind crank, holding in the rewind button, and simultaneously pulling the lever that would normally advance the film. The exact method for this will vary slightly with different cameras (if in doubt, check the instructions specific to your make and model) and it might take some practice, so be sure to test it out with a film you are happy to sacrifice!
This short video demonstrates how to override the advancement mechanism. Some of the more recent analogue cameras have a function for multiple exposure, and this video also points out the symbol to look for, as well as giving some general tips for analogue multiple exposures.
If your analogue camera doesn't have a multiple exposure function or the capability to override the advancement mechanism, you could mark where the first frame starts, shoot the entire roll of film, rewind it, and reload the film to line up with the marked frame. While this means that multiple exposure can be done on a wide range of film cameras, this method requires you to line up the film as accurately as possible without compromising the existing images, and to remember the content and order of every single shot.
You can also create multiple exposures on some digital cameras. To do this, you will need to go into your settings, find the shooting menu, and scroll through to find "multiple exposure". Unfortunately, my camera doesn't have this capability, but Sara K Byrne's video should be helpful if you're looking to give this a go.
If you plan to expose your film twice (or more!) it is important to underexpose your images. To layer two pictures, for example, you have to halve the amount of light coming in for each shot. You could do this by using one of these methods:
Doubling your shutter speed (e.g. 1/125 to 1/250) - this will freeze movement.
Doubling your f-stop (e.g. f/8 to f/11) - this will widen your depth of field.
Halving your ISO (for digital cameras, simply half the number, e.g. 200 to 100. For film cameras, set the ISO on the camera to double the ISO of your film, e.g. if your film is ISO 400, set the ISO on the camera to 800) - this will give the image less noise if you're using digital.
Add an ND2 filter onto the end of your lens - this is like putting sunglasses on. It will make it harder to see through and to frame your shot, but will allow you to keep your other settings the same.
If all of that sounds a bit too much, check your camera to see if it has an exposure compensation function, and set that to -1. The camera will work out the settings for you! This only works in aperture-priority, shutter-priority, and full auto modes (film or digital cameras), or full manual mode with "auto ISO" switched on (digital cameras only), as the camera will use your settings to decide what to adjust. Any of these methods will ensure the film doesn't become overexposed once the second shot is taken.
Another, simpler way to achieve a similar multiple exposure effect would be to shoot single frames and then overlay them in the darkroom when printing them. This gives you much more creative control, as you can expose each image for different lengths of time, you can position the negatives in various ways, and, crucially, you can try again if it goes wrong. If you create your multiple exposure in-camera, you are limited to the image you have on the film. If you create it in the darkroom, however, you have the freedom to experiment. You could dodge and burn different parts of each image to play with the exposure, or even splash the developer on selective areas.
If you already have images you want to combine, don't have access to analogue equipment, or even just fancy some digital creativity, you can always create a similar effect in Photoshop. With the ability to manipulate almost every conceivable aspect of an image, the possibilities are endless. At a very basic level, you could simply overlay two images and adjust the transparency to your liking. You could also use the overlay settings to alter how your two images interact, or you could even use a layer mask and painstakingly brush through every stroke of your images you want to show through. It really is up to you how you do it.
Adobe has put together a short tutorial to show you some of the basics - it's worth watching.
My plans are primarily to shoot some black-and-white film using the shoot-reload-shoot method, as I would like to combine two very different subjects - perhaps portraits and landscapes. I also quite like the idea of taking some digital photos of some flowers over the course of several days or weeks, and layering them together as a sort of time-lapse multiple exposure combination. Mostly, I just want to experiment and have a bit of fun with this!
If you decide to give multiple exposures a go, please let me know how you get on in the comments below!

Comments