
Easy Peasy Lumen Squeezy - All About Lumen Prints
- lizjenkin

- Jan 3, 2022
- 6 min read
Perhaps the earliest form of photography, photograms create an impression of an object, usually organic material, allowing us to see the natural world around us in another light. Lumen prints are a specific type of photogram made using photographic paper and sunlight; the resulting images look ghostly and ethereal. No negatives are needed for these processes (although you could definitely experiment with them!) just photo paper, an object to put onto it, some glass to put on top to create a contact, and light.
Known as the Father of Photography, William Henry Fox Talbot first created sensitised paper in the 1830s. He found that when foliage was put onto the paper and exposed to light, a ghostly impression of the leaves would be left behind where the sunlight couldn't fully pass through the plant. Talbot called this a "photogenic drawing". Sometimes he then used this image as a negative through which he exposed another piece of sensitised paper, creating a positive image of the plant.


Photographers
Jerry Burchfield
While Talbot pioneered the overarching photogenic drawing technique, it was Jerry Burchfield who popularised a specific branch of the photogram family, which he named "lumen prints". In the late 1990s, Burchfield visited the Amazon River Basin in South America, where he was captivated by the exotic beauty of the Amazonian plant life. He was keen to capture the essence of the rainforest, showcasing both its radiance and its fragility, so decided to use expired black-and-white photo paper to create photograms. This paper created incredibly vivid colours both during exposure and after fixing. Burchfield would usually tie the paper to his boat, at the mercy of the river and the weather; the way the environment interacted with his images makes them even more poignant and representative of the nature of the rainforest. They are exotic, vibrant, and worryingly transient, much like the forest itself if humanity fails to protect it.


You can read more about his Primal Images collection here.
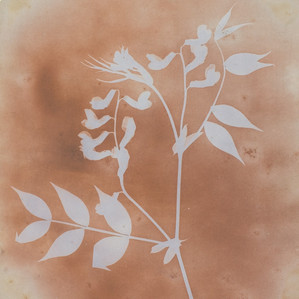
Natasha Sanchez
Below are images from several different series by the immensely creative Natasha Sanchez. She has been working with lumen prints for over a decade, and is constantly broadening her knowledge and refining her technique. Whether exploring the nutrition provided by the earth or the mourning traditions of the 19th Century, Sanchez always approaches her work with a philosophical mindset. I'm particularly excited by her Rain Gardens collection (bottom right) as she uses fibre-based photo paper, providing a greater range of colours and a fresh, modern take on lumen prints. This is something I'd love to try out!


Sanchez has an extensive range of projects using lumen prints. Her experiments are mesmerising, and definitely worth a look!
David Arnold
David Arnold has a keen eye for creative composition and loves to experiment in his work. Some of his most stunning pieces involve infrared photography, recovered film with unknown images, and even negatives chewed by his dog. Something I am fascinated by, however, is his work documenting the before and after of fixing lumen prints.
The Morning Glories Series... producing reds, blues, and yellows color shades... once fixed, the colors of the lumen print will change significantly, often ripening to rich browns and golden yellows - David Arnold
The drastic changes in colour after fixing highlight the importance of scanning your lumen print immediately after exposure, if you wish to preserve that image.


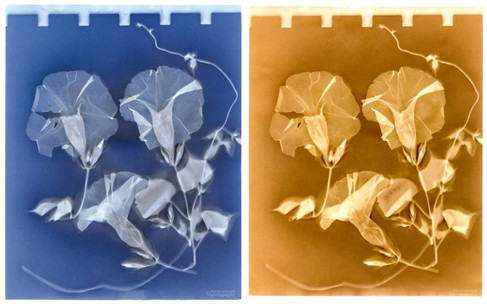
Check out more of Arnold's work here - there are plenty of examples of his lumen prints both before and after fixing.
How-To
Lumen prints are deceptively easy to create. At its basic level, all you need is some photo paper, some organic material, and a sunny day.
You will need:
Photo paper - expired is best, but any will do. Different papers might give you different effects, so feel free to experiment.
Organic material - delicate flowers, ferns, fruits, and feathers work beautifully. (Burchfield has even used roadkill, but I'm a sensitive soul and couldn't do that myself!) The thinner/flatter they are, the more detail you will get from them as the light shines through them.
A flat surface - this could be a tray, a book, or even the pavement outside, but you will need a flat surface to place your paper onto, to make sure you have a sharp, evenly-exposed print. Ideally it'll be something you can pick up and carry.
Glass, perspex, or a contact-printing frame - this is optional but highly recommended. Not only will it help keep your flowers from blowing away or moving, but a sheet of glass placed on top of the print will create a contact between the flowers and the paper. A firm contact will create sharper lines and finer details in your image. If you're using plants that don't flatten easily, you may get a softer outline. Contact-printing frames are purpose-built for this, but quite expensive. I'm clumsy, so tend to use a sheet of clear perspex, but a sheet of glass from a picture frame is fine. Be careful of sharp edges!
Sunshine - or failing that, a UV lamp. Being able to leave a print out in the sun, sometimes for hours, is a rare luxury in the UK. You might get lucky and have a scorcher, but on the other 364 dull days of the year, you may find it easier to use a UV lamp inside. You can create lumen prints outside in the middle of winter, of course, it will just likely take considerably longer to expose.
You may want:
Clamps - if you are using a tray, board, or book underneath your paper, clamping the glass down onto it will help maintain a strong contact and prevent any accidental movement of your print.
A scanner - your lumen print will keep exposing and changing over time, so if you want to preserve how it looks when you first reveal it, I highly recommend scanning it.
Fix - if you fix your lumen print, the image will stay on the paper, but it will drastically change. The colours can be incredible, but remember to scan the print before fixing as you can't reverse it later!
A room with subdued or tungsten lighting - when you take the paper out of the bag, this must be in darkness or the rest of the stack of paper will be compromised and become fogged. If the paper is already fogged or you're using the whole lot, this is less of an issue, but setting up your composition in subdued lighting will prevent your paper from being exposed too early.
Method:
(In a darkroom/under subdued light) Take a piece of photo paper and put it onto your flat surface, emulsion side up.
Place your organic materials onto your paper in whatever layout you want.
Place the glass on top of the plants, clamping it in place if you can.
Take this outside (or switch on your UV lamp) and expose it directly under the light. Try to avoid shadows or places where your print might be disturbed.
Let it expose under the light for up to an hour. Experiment with timings - some photographers' prints are exposed for minutes, and others for months. There is no real right timing. (Tip: if you plan on fixing the image, expose it for a little longer as the fixing process can bleach the paper slightly.)
Remove your paper and admire your creation!
Ideally - scan your image as soon as possible, keeping it away from light in the meantime.
If desired - put your image into a fix solution and then wash it in running water. The timings for these will depend on what paper and fix you use.
Recommended: Ilford Rapid Fixer - 1 part concentrate to 9 parts water. This solution can be reused if you're doing multiple prints (1 litre of solution for approximately 80 8"x10" prints, store in an airtight container for up to a week).
Resin-coated paper - fix for at least 2 minutes, wash for at least 5 minutes.
Fibre-based paper - fix for at least 2 minutes, wash for at least 60 minutes.
Alternative: Salt water - 300g of salt to 1 litre of warm water. People have had mixed results with this - I tried it before and it didn't work for me. Prints need to be fixed for at least 24 hours.
It's currently mid-winter here, and the weather forecast is awful. I'd best dig out my UV lamp to get making some lumen prints!

Comments